Integrate Jaws Deploy with TeamCity
Trigger Jaws Deploy directly from TeamCity build using a first‑class plugin, PowerShell SDK or directly by calling the REST API. This page explains installation, configuration, available build step and best practices.
At a glance
- Who is this for? Teams using TeamCity for CI and Jaws Deploy for releases and deployments (CD).
- What you get: Native TeamCity build steps for creating releases, deploying and promoting releases across environments. Alternatively concise code snippets to integrated throught our PowerShell SDK.
- Supported TeamCity versions: 2021.2+ (recommended 2022.10 or newer)
Prerequisites
- Administrative access to a TeamCity server (2021.2+).
- Administrative access to a Jaws Deploy instance (Cloud or on-premise).
- Service account created inside Jaws Deploy and access to the service account's login (Service Account ID) and its API Key (the password). Read more about service accounts.
Jaws Deploy plugin for TeamCity
- Download the plugin from https://github.com/JawsDeploy/jawsdeploy-teamcity-plugin
- Go to TeamCity → Administration → Plugins → Upload plugin zip.
- Upload the downloaded
teamcity-jawsdeploy-plugin.zip.The plugin will appear on the plugins list below. - Enable the plugin by clicking the "Enable" button next to the plugin name on the list.
- Go to your desired build configuration in Settings mode and go to Build Steps.
- Click "Add build step" and choose "Jaws Deploy" from the list.
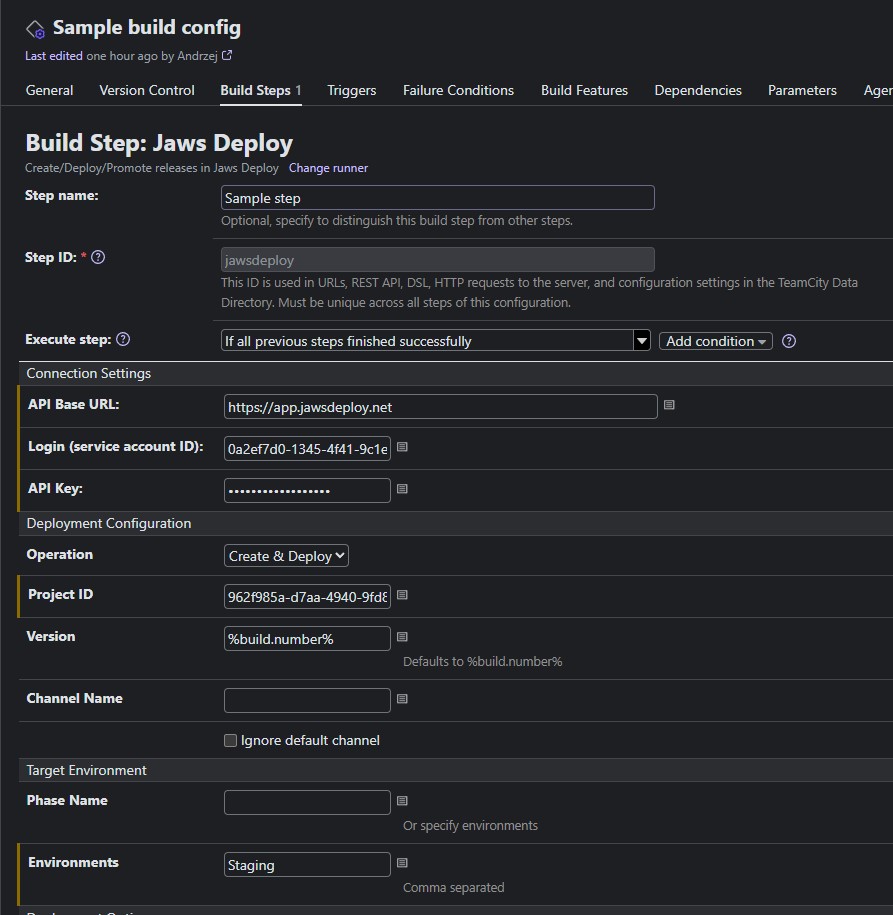
- Fill in build step parameters:
API Base URL: (required) API URL pointing to your Jaws Deploy installation (default:https://app.jawsdeploy.net).Login: (required) Service account ID.API Key: (required) Service account api key.Operation: (required)
- Create & Deploy: creates a release with a given version (or auto-generates the version by incrementing patch number). Then deploys the release to the given environment.
- Promote: promotes and existing release to another environment.Project ID: (required) ID of the project to be deployed (find it on the project page inside Jaws Deploy App GUI).Version: (optional) Version number following the SemVer 2.0 specification which should be created or promoted. Leave empty to let Jaws Deploy auto-generate this value.Channel name: (optional) Name of the channel to use for deploying a project with lifecycle management.Environments: (required) Comma-separated list of environment names to deploy to; typically deploy to a single environment e.g.ProductionRelease notes:(optional) Release notes. Ignored whenOperation=Promote.Redownload packages:set to true if you need to Jaws Agent to re-download packages from the package source (external, or built-in feed).Exclude step names:(optional) Comma-separated list of project step names which should be excluded upon deployment. Ignored whenOperation=Promote.
Note: all text fields support TeamCity parameters e.g.API Key = %JAWS_API_KEY% - Save the build step and run the build in TeamCity. When build encounters this step a release will be deployed, its progress will be tracked, and all deployment logs from Jaws Deploy will be sent to TeamCity build log.
Jaws Deploy PowerShell SDK
- Create a VCS root in your TeamCity project pointing to the GitHub repository containing the Jaws Deploy SDK: JawsDeploy/powershell-sdk. Your project may already contain a VCS root - that's fine, just add another one. By having the SDK hooked via VCS you always get the latest version. If you need to freeze the code - either package the SDK's .
psm1file(s) and make it an artifact available to your builds, or copy that .psm1to your own Git repository and point your new VCS root to that repository. - Optionally specify checkout rules for this new VCS if you want to put the Jaws Deploy SDK script (
.psm1) into a special folder, avoiding any conflicts with your existing application code e.g.:+:JawsDeploySdk.psm1 => ./_teamcityThis way the SDK file will not interfere with other files in your agent's work folder. - Click "Add build step" and choose "PowerShell" runner from the list.
- Configure the build step to run code similar to the snippet below. Note that the snippet uses some build parameters (
%param_name%), which you can set up within TeamCity build configuration (Parameterstab): # create release and deploy
$env:JAWS_API_BASE_URL = "%JawsDeployApiUrl%"
$env:JAWS_API_LOGIN = "%JawsDeployLogin%"
$env:JAWS_API_PASSWORD = "%JawsDeployApiKey%"
Import-Module -Name (Join-Path "." _teamcity Jaws.psm1)
$projectId = "%MyApp_ProjectId%"
$jawsEnv = "%DeploymentEnvironment%"
$resp = Invoke-ReleaseAndDeployProject -projectId $projectId -version "%build.number%" -environmentName $jawsEnv
Write-Host $resp
# promote an existing release (latest)
$resp = Invoke-PromoteRelease -projectId $projectId -environmentName $jawsEnv
Write-Host $resp
# promote specific release by specifying its version
$resp = Invoke-PromoteRelease -projectId $projectId -environmentName $jawsEnv -version "%build.number%"
Write-Host $resp- Implementing such integration using TeamCity parameters is the recommended approach - makes your integration more flexible. Also note how base URL and credentials are provided to the SDK via environment variables. This part can be skipped when your build agent server has those environment variables already configured on the OS level. In that case the SDK will pick them up from the environment.
Coding against Jaws Deploy REST API
- If none of the above options suits your requirements, you need to fall back to raw HTTP calls from your TeamCity build steps. Any scripting language will work, however exact implementation is out of scope of this guide. Refer to our SDK (JawsDeploy/powershell-sdk) to get an idea how the HTTP interoperability can be coded.
- Choose appropriate TeamCity runner (bash, cmd, PowerShell, python or similar) and implement require HTTP interactions in the language of your choice.